-->

Friday, August 22, 2014

A Visit to the Lake (July 2014)

Some of our family's dear friends have a beautiful lake house to which we were invited for a weekend this past July.  It is a stunning home with even more amazing hosts.  We went tooling around on their boat, ate meals overlooking the lake on their deck, and stayed up late chatting and eating popcorn.  But, the best element of the weekend was introducing our kids to their grandkids...they clicked immediately, and by the end of the 2-day stay, they were crying about how much they would miss each other.  Ooh, maybe we'll have another reason to visit next year...??

I couldn't arrive empty-handed, so I tried out some ideas for a lakehouse theme.


I started with a design for a motorboat.  The actual picture I used for inspiration I had found while searching Google images.  It was a picture of a resort's logo that I adapted to work on a cookie.  I did this one a little backwards, starting with the water, but then working on the boat, filling in the yellow background last, and adding birds using the food marker pen.


SemiSweet Designs is another amazing blog I go to for inspiration.  He had created beach umbrella cookies using a spider web cookie cutter (genius!).  I know this family loves the yellow umbrellas on their deck, so I thought I'd make the platter more personal for them with this design.


 While looking at the same post from SemiSweet Designs, I saw his amazing Adirondack chairs using Sweet Sugarbelle's school bus cookie cutter (which I happen to own!).  He is so creative!  A no-brainer...I had to try them.  He had the luxury of using a Kopykake projector to make the design perfect, but I free-handed to the best of my ability all with 20-second icing.  Overall, I think they're recognizable.


These life jackets were my own design, however.  I took my t-shirt cookie cutter, and just cut off the arms prior to baking. They were actually pretty simple, but they turned out to be my favorites of the group.  I started with the orange vest, piped a bit of blue down the middle, and let them dry.  Later, I added yellow stripes and details with a food marker pen.


 Since none of my platters are complete without some mini options, I added some anchor designs, inspired by Sweet Goosie Girl's etsy shop.


I was happy to bring a platter worth sharing, and we were all delighted with our visit.
Thanks for the great weekend!

Thursday, August 21, 2014

Born (near) the Fourth of July (July 2014)

One of our neighbors had a baby in late June.  As we were out-of-town and busy with 4th of July festivities, this was the first chance I had to create something to celebrate baby Matthew's arrival.  Can you guess what colors of icing I had leftover?


 The polka dot onesies were all made while wet, with the star embellishment added for fun.  (I sure have gotten mileage out of Wilton's Jumbo Star Sprinkles lately.)
 

The other two patterns were added after the wet flood icing had dried.


We are so happy to welcome another little baby in our neighborhood.


All the kids will be playing together before we know it!
Congratulations!

Surfin' USA (July 2014)

So, the 4th of July might be one of my all-time favorite days of the year.  It is truly a "family day," as my kids would say.  (Basically, the name for weekends and any "extra" days we get as a family all together.)  Between the parade in the morning and the neighborhood festival with rides, carnival food, and live music, who wouldn't want to stay up late?  And that...staying up until past 9:00...is the ultimate "special treat" for the kids.  Our new house happens to be located right next to a country club that puts on a pretty spectacular fireworks show.  Therefore, we basically have a personal, up-close view, all while sitting in pajamas on our back deck...it's amazing. 
(Not sure why that wasn't listed on the MLS website...what a perk!)

But enough about all the reasons we love the 4th at our house.  Let's talk cookies!  My daughter, was the inspiration for these, as she was singing The Beach Boys, "Surfin' USA" on our roadtrip back home, and voila, an idea was born.


 Red, white, and blue is my favorite color palette.  It looks good on everyone and is so classic.


For the beach cookie, I let the blue set overnight and then used some brush embroidery to paint some waves on top.  (I should have used a different brush in hindsight...ah, lesson learned.)  The brown sand I outlined and filled, but then when almost dry, I dabbed my finger around the semi-dry icing to give it some texture.  (I thought a long time about how to create texture here, and then, this simple trick came to mind.)  I used a toothpick to write USA, and then a red star was added before entirely dry.


The surfboards were all hand cut with cookie dough.  Very time-consuming, and not too uniform in shape.  In the future, I will spend more time recycling a cutter that I own or give up and purchase a surfboard cutter.


I looked online for awhile, gathering ideas for surfboard designs, finally deciding upon these.  I particularly like the blue and white wave design and the ones with the "flower."  Those flowers were made using a cool technique when the icing was still wet.  First, I flooded the background color, and then, while the icing was still wet, I drew a circle in a different color on top, dragging a toothpick through it to create a flower effect.


Oh, and then because I love a good theme, I added a few sharks.  They were inspired by Sweet Sugarbelle, but I made them a bit simpler.  We had come home from vacation June 30th, so let's remember, I didn't have much time here!
 

These pictures were taken on a platter, looking all festive and formal, but in reality, they were eaten during the fireworks, so who knows if anyone even saw these designs anyway (!)

Happy Fourth!

Wednesday, August 13, 2014

Hittin the Road (and the Beach) (June 2014)

Hooray for summer!  This year, we decided to stick with our traditional option of renting a house by a lake for a week.  With the kids being 4 and 2, there really is nothing better than being near a zero-entry lake and having access to lots and lots of sand.  We get messy, we visit with family, and we do, well, nothing.  This year, instead of heading north to Michigan, we were going earlier in the year, so we tried Kentucky Lake for the first time.  The weather was much warmer, and the kids had a blast.  Here are the cookies I took along for our week of vacationing (and snacking).


Let me first say, that I'm going crazy looking at the sand castle cookies.  I was inspired by Make Me Cake Me's design.  I knew I didn't have a lot of time to devote to these, so I was going to simplify the design a bit (as I was in the midst of packing for the trip and, let's remember, also transitioning between jobs).  I just wished I had created the same ridges on the top of the castles as I did on the bottom.  Driving you crazy too now, right? (or is it just me?).


Anyhow, these were pretty easy.  I used a tan color to outline and flood the cookie, and then I re-outlined so I could sprinkle on some coarse sugar.  I had originally tried graham cracker crumbs, but that turned out to be a mess.  In the future, SemiSweet Designs has a great tutorial on using graham crackers and even using them to look like moss.


 I made the pink triangle next, immediately covering it with little rainbow non-pareils.  (My daughter enjoyed helping with this part.)  Then I added a little white flagpole, and voila!

 
The beach ball also required 2-part outlining.  First, I used the white piping icing to outline my ball and the different sections.  I used yellow as the primary color, alternating sections, and then 3 other accent colors.  I then re-outlined in white to make the colors stand out a bit more.


We snacked on these goodies all week-long, and we gave a few to the staff at our resort.


Summer is the best, and this vacation couldn't have come at a better time...we all deserved to take a break!

Tuesday, August 5, 2014

Time to Stop and Smell the...Zinnias (June 2014)

Spring is here and full of changes.  Recently, I decided to take a leap of faith and leave the hospital I've been working at for the past 10 years.  I mean, I'm still going to be there occasionally to help as-needed, but when my co-workers decided to throw me a farewell lunch, it started to sink in...I'm (gulp) really doing this.  I cleaned out my desk (filling my car trunk to the brim), and I'm moving on to pursue therapy in the private practice realm.

Not only will this venture provide me with new career opportunities, but it will afford me the flexibility to spend more time with my kids, as I'll be the one making my schedule.  Yes, when I didn't get to see my son at all on his 2nd birthday (and I mean leaving for work and coming home from work when he was sleeping), I decided...I need some time to stop and smell the flowers.

Thus, at the farewell lunch, I brought zinnias.  I will miss seeing many of my co-workers on a regular basis, but those with whom I have developed close friendships will continue to stay close regardless of where we work, I'm sure.


These zinnias, although a workout in hand strength and patience, are fairly simple to make.


I found the design on Cookies with Character's website, and I thought, I want to try that!


I used a basic scalloped cookie cutter, and then made little loops using 20-second icing all around the outer circle, alternating between "petals."  Then I filled in the missing spaces with more loops once they set up a bit.  Then, yep, you guessed it.  I continued with the second and third layers.


Once dry, I added some icing to the centers and sprinkled some non-pareils on top for texture.


I didn't worry that my loops weren't "perfect," as there were so many layers of frosting, that I think it just made them look more natural...can I justify any other lazy techniques with that rationale too?


I added some quick leaves and mason jars (a cookie cutter I've been excited to use), just as seen in the design, but I chose a simpler mason jar design, inspired by The Baked Equation.


These cookies really looked best all lined up on a platter, and I was happy to bring a personal treat to share at the lunch.

Although change can be difficult, I know I made the right decision for me and my family, and I look forward to seeing how this new opportunity for a better work-life balance will blossom over time.  

(See how I wove that last little pun in there?  Yeah, I know...)

Wednesday, July 16, 2014

Everybody say, "Yea-ah!" (June 2014)

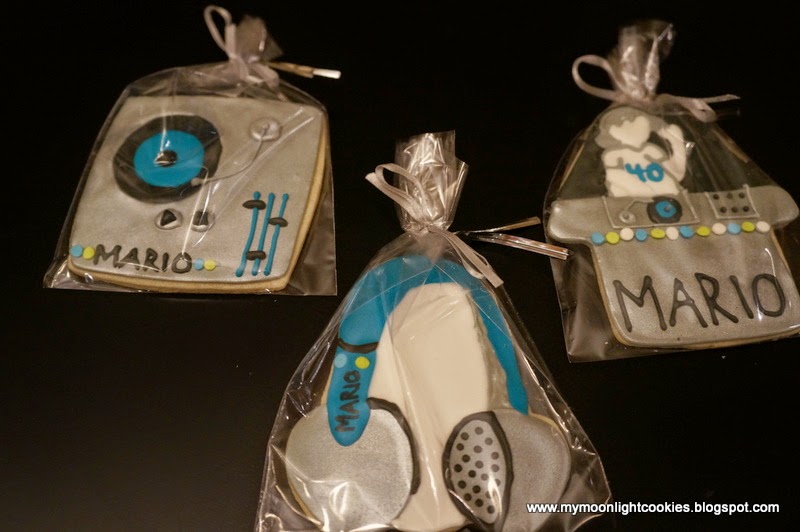
One of the moms at my daughter's school approached me to make some birthday favors for a surprise party she was throwing for her husband's 40th birthday.  But, not ordinary "Happy Birthday" cookies...there was a theme.  (I was loving the idea already.)  She told me that he works hard for his family, holding a steady job during the day and DJ-ing gigs at night, so she was using his DJ hobby as the theme for the party.  The wheels in my head were turning already.  I did some searching on-line, and I found an image on pinterest that I knew I could use as inspiration. 

With her approval, I moved forward designing personalized turntables, headphones, and DJ booth.  


The turntables were made from a square cookie cutter.  I tried to tie all the cookies together, using the same colors, same quin accents, and same silver sheen (Wilton food mist).  I sprayed all the silver parts first, then continued on, decorating the accents.  I also tried to design them with the colors she had in mind and without too much black (no fun to have everyone with black mouths at the party, as seen in previous record cookies...eek!).

 
The headphones were made from the most unusual cookie cutter, a teddy bear, which required a bit of cutting before baking.  I struggled a bit with how to add texture to the headphone speaker, even trying one of Sweet Sugarbelle's newest techniques, but after attempting with little success, I decided that simpler was better in the end (as it usually is).


The DJ booth was definitely my most challenging, but most rewarding.  I used a house cookie cutter with a little bit of trimming pre-baking.  The 20-second icing was used in stages to give an outline to our guy's arm and head, but was otherwise not as intimidating once I attempted it.


These were fairly big cookies, at least 4-5 inches, so it required more than one batch of dough...good for me to remember in the future for these larger requests. 


 I bagged and tied these cookies up, and they were used as favors for all the guests.  


This mom put so much work into the party details and planning, and I was glad I could play a small part in it too.  I hope he was truly surprised and that the party was a success.  

Happy Birthday, Mario!

Saturday, July 12, 2014

Happy Birthday, Little Tiger! (May 2014)

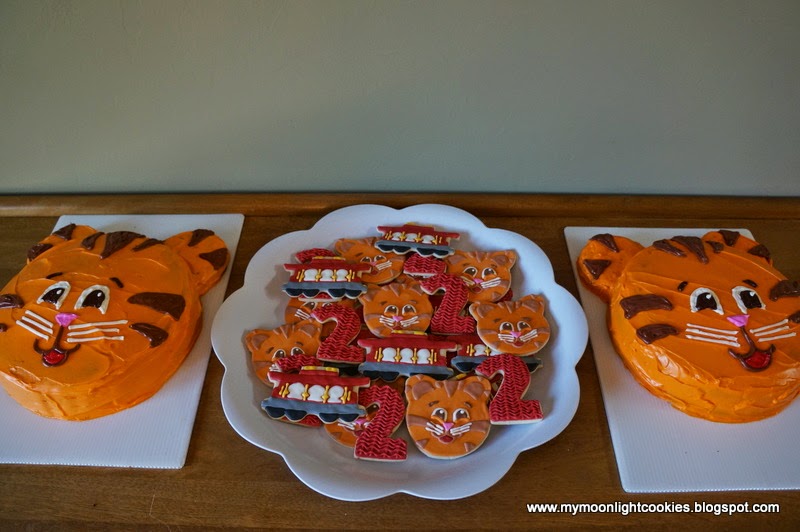
Wow, how is my boy 2 years old?!  I mean, when did that happen?  He is at such a fun age though, talking up a storm and doing everything his big sister does.  We don't have that many shows that we watch on tv, as there are only a couple that I trust and feel I don't have to screen episode-for-episode.  Daniel Tiger is one of them.  It's a sort of spin-off of Mister Rogers' Neighborhood using familiar characters and short songs to teach social-emotional lessons.  My kids soak these up like sponges, and it's amazing, but during a rough time, we'll sing a little tune from the show, and it seems to just click with them.  Anything from, "When you're sick, rest is best" to "Use your words" to "Stop and listen to stay safe."  Anyhow, being a therapist, I could go on and on with how much I love this show, but thankfully since my son is so enamored with it too, I could filter that love into cookies for his birthday party.

Although we're focusing on cookies here, I wanted to include my 2 birthday cakes I made.  (One would definitely have been enough, but at the last minute I got worried that I would fall short...did you hear that one-year-from-now Beth?)  Anyhow, I made the cake part real easy.  I used boxed-cake mix, boxed-brownie mix (for the gluten-free ears), and pre-made frosting (who doesn't love that?).  I used my food coloring to decorate, and it really was simple compared to the cookies.


For the cookies, I knew I wanted to make Daniel.  I used a simple circle cookie cutter and added two smaller circle shapes to the top for ears prior to baking.  Then I flooded it orange and added details.  I used one of Sweet Sugarbelle's tips on adding that little white glisten dot on his eyes, and I think it helped bring him to life.


Next, I made his trolley using a trolley cookie cookie cutter.  After trying to figure out how to create one with a train cookie cutter and some other shapes, I ended up just giving in and purchasing one from Karen's Cookies.  (They have almost any shape imaginable, and they are so friendly.)


Finally, I wanted a more basic design for the platter, since the other two were more elaborate.  I purchased a set of number cookies from Sur La Table.  I know, I keep buying cookie cutters, but how could I not have a set of numbers?  I have all the letters, and I'm sure to use them again, and hey...stop justifying, my collection is a few cents each.  (I know I have a sickness.)


 These were outlined and flooded with red, and then, I tried to give it some texture, resembling Daniel's favorite red sweater.  I'm not sure if I captured the knitting, but it was an interesting pop of color on the platter.


Everyone ended up taking some cookies home as a favor, since our guests tend not to want to touch the cookies on the platter during the party despite my insisting.


It was a "grrr-ific" party, and I know my little guy had fun celebrating.  
Happy birthday sweet boy!