-->

Tuesday, November 11, 2014

The Force is Strong With This One (October 2014)

So, I a few months ago I received an invitation to my friend Mary's baby shower.  She now lives in Washington DC and we don't talk as much as we used to, but I didn't even know she was pregnant!  I assumed because I have not yet joined the Facebook revolution that that was why I was left out-of-the-loop, but no, she said she wanted to surprise all the guests and that no one had known.  
Could have killed her. :)

I couldn't be happier for Shaman and her, and when I found out they were coming to Chicago for one of their baby showers, I knew I wanted to contribute some cookies, especially since I knew this was going to be no run-of-the-mill baby shower.  I was right...my eclectic friends chose a Star Wars theme for their shower, and, from what we learned at the shower, their little daughter will receive a name likely based on a character from one of the movies/books.

Now, being a person who has not even sat through one full Star Wars movie (I know, Mary and Shaman don't even understand our friendship), I didn't really know where to start.  I did some research, but pretty much stayed true to my original inspiration, Princess Leia and her famous buns...yes, even I know that.


So, Princess Leia was the only feminine aspect of Star Wars that I could think of.


I used two skull-shaped cookie cutters and overlapped them on the dough before baking, creating the shape of Leia's head.  I used 20-second icing to create an ivory face, and then I alternated using 20-second brown icing for her hair, waiting for each side of her part to dry first before filling in the adjacent side.  I used a few piping details, and voila...not too tricky.


I wanted to also have some full-length Leia's...well, not full-length, you know.  I used the Wilton girl cookie cutter, since she already has pigtails.  Really, Leia is pretty easy or maybe boring?  Who designs the only love interest to be dressed in an all-white smock?  I found a picture of her with a silver belt, so I went with it!  Again, I waited for each part of her white "ensemble" to dry before adding another white element, like with the boots.  And, I tried to add some more femininity with the heart-shaped pink lips...really trying here!


Ah yes, the rattle-shaped pink light saber...what, that's not a thing?

I decided to keep the rattle shape since, after all, it was a baby shower; I figured with it being so thin, the light might break off its handle too easily (lesson learned from many disassembled umbrella cookies); and maybe the extra sprinkles helped to give a little aura around the light?


But, perhaps my favorite was the last-minute onesie cookie.  I had forgotten that Shaman and Mary's dog is named Luke (of course he is). :)  
These could not have been made for any other reason!


Some of the Leia faces were bagged as favors saying, "Celebrating Mary and her bun in the oven."
I know...


 The rest looked seemed to work together nicely on a platter.  Seriously, this is one of the most fun projects I've ever worked on.  It really pushed my creativity (as there was no one out there who had designs I could copy), so I take full ownership of these cookies (and my limited Star Wars knowledge).

To Shaman and Mary, I wish you both all the best welcoming your new little "Star Trooper."  
May she be as awesome and unique as you both are. :)

Monday, November 3, 2014

Baptism Celebration Dresses (October 2014)

One of our good friends had a baby recently, so for her baptism, I wanted to make some little dresses to honor the occasion (in cookie form, of course).  I had been very inspired by a post I saw on Pinterest (where else?).  I'm not sure what language/country this is, but the cookies speak for themselves.  I was overwhelmed at first by the many different variations, but I had such fun creating new designs with the simple color palette, I could see how this baker made so many varieties.


I first outlined and flooded the dresses all in white.  I added another layer of white outline to help make the shape stand out.  I was impressed with how different each dress looked even though I was using only white, pink, and a bit of green.  Additionally, all the designs were created by simply varying the placement of ruffles, dots, roses, sashes, and waistlines.  I think the combinations are endless.


To pull together all the different dress designs, I decided to create a monogram using the wet-on-wet technique for making roses as a background (just as I had done with these baby onesie cookies.)


For the mini option, I chose simple pink hearts.


Although I was happy with how they turned out, I was kicking myself for running out of pink party plates (or any color for that matter).  We were leaving the platter at the celebration, so my go-to platter wasn't available.  That meant, a regular paper plate...
NOT my first choice, but what can you do?

Happy to celebrate with you, Makena!

Thursday, October 16, 2014

Filigree Challenge (September 2014)

"Filigree," although a very familiar-looking design, was an unknown word to me until a few months ago.  I discovered Sweet Ambs cookie art, and well, wow.  She makes some of the most detailed, ornate, and elaborate designs ever, and almost always finishes them with a little airbrushing and gold luster dust.  Knowing how much time it takes me to complete much simpler designs, I wonder how many hours she spends...
really, it's impressive.  

Well, I had admired one of her designs awhile back.  They were her interpretation of a set of mugs from Anthropologie (now no longer sold in the store).  So beautiful...the colors, the design, and yes, the filigree.  

After some trial-and-(lots of)-error, I decided to cut way back on the details of the design, focusing instead on a few key elements.  I also scaled back on the number of color combinations I was using and added some mini flowers to the platter.  This was the end result.


She does almost everything with a wet-on-wet technique.  The difficult thing about this decorating style is that all the colors need to be pre-mixed and ready to go.  Also, the margin for error is much less, since it's all blending and drying together in one flat, cohesive design.  That means the filigree design has to be created in one fell swoop.  But, if you are new to this technique and watch her tutorial, she makes it look so easy.
Much too easy (it's super-tricky!!).


You know, I was up for the challenge, though.  Always good to try new things, right?


And, since I had no clue how I would fare, I didn't even have a real occasion for which to make these.  I ended up bringing them to a family picnic.  They were all eaten, but perhaps a bit fancy for that get-together.


 It's hard to rationalize that no matter how long the cookie takes to decorate or how intricate the design, they could be a total "failure," and still taste yummy.

But then...what's the fun in that? :)

Happy Birthday, Peanut! (September 2014)

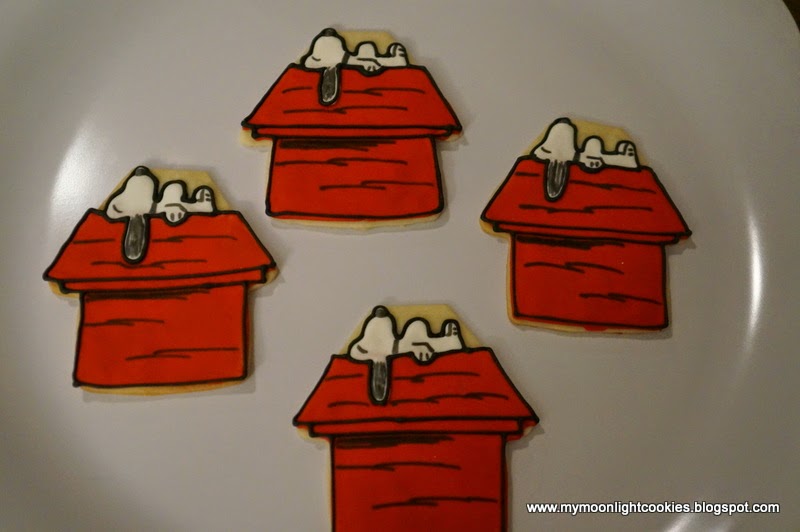
Wow, am I behind on blog postings!  I made these cookies (at least a month ago) for my friend's daughter's 1st birthday party.  The little girl is such a cutie pie, and she has since earned the nickname, "Peanut" from everyone she knows.  Therefore, her mom decided Peanuts (and all things Charlie Brown) was to be the theme of the party.  After some thinking, we decided that this design would be the best favor to hand out. 
(Maybe symbolizing the end to a good party? :)


I used a house cookie cutter and trimmed off the pointy top.  I didn't realize just how big this cookie cutter was, though...it required 3 batches of cookie dough to make the requested 80 cookies...woah.  I outlined and flooded the cookies all in red, and then free-handed a white Snoopy dog on top.  He's actually just a bunch of little lumps, and after doing 80, I sort of got the hang of it.


I re-outlined Snoopy and his house in black to make the colors really pop.  I thought about my next step for awhile, but since these were cartoons originally, I used a black food marker pen (as opposed to more icing) to sketch in the details, giving it a more hand-drawn look (since it was!). 


 I bagged and tied them with with a red ribbon to finish them off.


A fun project for sure, and although we had to leave the party before the favors were passed out, it sure seemed that Miss Peanut was having a great time.

Best wishes to the birthday girl!

Tuesday, September 2, 2014

Summer Wedding Showers (August 2014)

Near the end of the summer, but still going strong with "wedding season" it seems.  These two batches of cookies were made for friends of our family.  This one, was for Amy.  My mom was heavily involved with the planning of her shower, and as such, I thought I'd offer to make the favors.  It's a group of 4 wedding gowns, very similar in design to cookies I made earlier in the year for another wedding shower, making the planning very easy.


I made a few minor changes, like adding some pink rose details and bows and adding some white sanding sugar on some of the dress busts.  (Difficult to see from these pictures, but we're lucky I have any to share...I gave these to my mom without thinking to take any pictures ahead of time.  Thankfully, she was able to figure out her i-phone enough to take a few for history's sake...thanks mom! :)


 She used cellophane bags with a black ribbon and name tag to package the cookies.  They were placed on each girl's plate at the shower, serving as a place card and favor...smart planning!


This is my attempt at a wedding gown, with a design inspired by Sweet Ambs' famed filigree pattern.  I then used a royal icing rose I had made awhile back on the dress and the tux as an accent.  These had just been waiting to be used on the right cookie.  Finally, the pre-made royal icing transfers are paying off!


These wedding shower cookies were for Julia, as requested by her aunt.  She lives out-of-town, and the family had thought that they would be unable to celebrate with her.  Then, in a last-minute arrangement, Julia was able to travel to Chicago, sending her very thoughtful aunt into action, planning the perfect *surprise* shower...so sweet!


 There wasn't much time to prepare, so I decided to use some of my tried and true designs (dresses, cakes), and also accommodate the request to personalize the cookies if possible by playing around with some new ideas. 


That's where I decided to add their first names to my double heart cookies and the "B" monogram on a design I adapted from Sweet Treats By Casey, as seen on Pinterest.  She had used a stencil and an airbrush machine, but since I had neither, I improvised with a food marker pen.
 

These were going to be served on a platter at their family's gathering, so I thought an assortment would work best.


I was so happy to be a part of these ladies' celebrations.  
Thank you for including me, and congratulations!

Friday, August 22, 2014

A Visit to the Lake (July 2014)

Some of our family's dear friends have a beautiful lake house to which we were invited for a weekend this past July.  It is a stunning home with even more amazing hosts.  We went tooling around on their boat, ate meals overlooking the lake on their deck, and stayed up late chatting and eating popcorn.  But, the best element of the weekend was introducing our kids to their grandkids...they clicked immediately, and by the end of the 2-day stay, they were crying about how much they would miss each other.  Ooh, maybe we'll have another reason to visit next year...??

I couldn't arrive empty-handed, so I tried out some ideas for a lakehouse theme.


I started with a design for a motorboat.  The actual picture I used for inspiration I had found while searching Google images.  It was a picture of a resort's logo that I adapted to work on a cookie.  I did this one a little backwards, starting with the water, but then working on the boat, filling in the yellow background last, and adding birds using the food marker pen.


SemiSweet Designs is another amazing blog I go to for inspiration.  He had created beach umbrella cookies using a spider web cookie cutter (genius!).  I know this family loves the yellow umbrellas on their deck, so I thought I'd make the platter more personal for them with this design.


 While looking at the same post from SemiSweet Designs, I saw his amazing Adirondack chairs using Sweet Sugarbelle's school bus cookie cutter (which I happen to own!).  He is so creative!  A no-brainer...I had to try them.  He had the luxury of using a Kopykake projector to make the design perfect, but I free-handed to the best of my ability all with 20-second icing.  Overall, I think they're recognizable.


These life jackets were my own design, however.  I took my t-shirt cookie cutter, and just cut off the arms prior to baking. They were actually pretty simple, but they turned out to be my favorites of the group.  I started with the orange vest, piped a bit of blue down the middle, and let them dry.  Later, I added yellow stripes and details with a food marker pen.


 Since none of my platters are complete without some mini options, I added some anchor designs, inspired by Sweet Goosie Girl's etsy shop.


I was happy to bring a platter worth sharing, and we were all delighted with our visit.
Thanks for the great weekend!

Thursday, August 21, 2014

Born (near) the Fourth of July (July 2014)

One of our neighbors had a baby in late June.  As we were out-of-town and busy with 4th of July festivities, this was the first chance I had to create something to celebrate baby Matthew's arrival.  Can you guess what colors of icing I had leftover?


 The polka dot onesies were all made while wet, with the star embellishment added for fun.  (I sure have gotten mileage out of Wilton's Jumbo Star Sprinkles lately.)
 

The other two patterns were added after the wet flood icing had dried.


We are so happy to welcome another little baby in our neighborhood.


All the kids will be playing together before we know it!
Congratulations!

Surfin' USA (July 2014)

So, the 4th of July might be one of my all-time favorite days of the year.  It is truly a "family day," as my kids would say.  (Basically, the name for weekends and any "extra" days we get as a family all together.)  Between the parade in the morning and the neighborhood festival with rides, carnival food, and live music, who wouldn't want to stay up late?  And that...staying up until past 9:00...is the ultimate "special treat" for the kids.  Our new house happens to be located right next to a country club that puts on a pretty spectacular fireworks show.  Therefore, we basically have a personal, up-close view, all while sitting in pajamas on our back deck...it's amazing. 
(Not sure why that wasn't listed on the MLS website...what a perk!)

But enough about all the reasons we love the 4th at our house.  Let's talk cookies!  My daughter, was the inspiration for these, as she was singing The Beach Boys, "Surfin' USA" on our roadtrip back home, and voila, an idea was born.


 Red, white, and blue is my favorite color palette.  It looks good on everyone and is so classic.


For the beach cookie, I let the blue set overnight and then used some brush embroidery to paint some waves on top.  (I should have used a different brush in hindsight...ah, lesson learned.)  The brown sand I outlined and filled, but then when almost dry, I dabbed my finger around the semi-dry icing to give it some texture.  (I thought a long time about how to create texture here, and then, this simple trick came to mind.)  I used a toothpick to write USA, and then a red star was added before entirely dry.


The surfboards were all hand cut with cookie dough.  Very time-consuming, and not too uniform in shape.  In the future, I will spend more time recycling a cutter that I own or give up and purchase a surfboard cutter.


I looked online for awhile, gathering ideas for surfboard designs, finally deciding upon these.  I particularly like the blue and white wave design and the ones with the "flower."  Those flowers were made using a cool technique when the icing was still wet.  First, I flooded the background color, and then, while the icing was still wet, I drew a circle in a different color on top, dragging a toothpick through it to create a flower effect.


Oh, and then because I love a good theme, I added a few sharks.  They were inspired by Sweet Sugarbelle, but I made them a bit simpler.  We had come home from vacation June 30th, so let's remember, I didn't have much time here!
 

These pictures were taken on a platter, looking all festive and formal, but in reality, they were eaten during the fireworks, so who knows if anyone even saw these designs anyway (!)

Happy Fourth!