-->
Showing posts with label Birthday. Show all posts

Saturday, February 25, 2017

Hoppy Spring Birthday! (April 2015)


Easter Time + Friends' Daughters' Birthday = HOPPY SPRING BIRTHDAY!


I've loved these designs from some of my favorite bloggers, and now I have a chance to try them out.
Thanks, Sweet Sugarbelle, for the inspiration (again!)


A splash of color for the platter...


There should be more occasions to make polka-dot bunny bottoms...cute!


Sunday, October 4, 2015

A Royal Birthday Celebration (March 2015)

So, a good 6 months have gone by since I've made this batch of cookies.  Life gets busy.  But, in these last few months, I have had some time to reflect on the various cookies I've made over the years, and these, well, just may be my all-time favorite ones (as least thus-far).

As anyone with a daughter approaching 5 years old can attest, there is nothing quite as captivating as those Disney princesses.  Whenever her friends come to play, the first thing they do is decide which dress they are going to wear from our costume stash.  They'll play a game or two, but then, there are more decisions are wardrobe changes as the play date carries on.  So, we thought it would be fun to host a Royal Costume Birthday Ball, with princess (and prince) cookies to match.

 
I was most inspired by a photo I had seen on Pinterest from the Etsy store, NotBettyCookies.  Her stuff is amazing!  
 
At first my husband thought I was crazy.  But, I stayed focused and persevered, taking it one step/dress at a time.  Look closely at each cookie...there really are only a few colors on each with just a few important details.  When I looked at it that way, the project wasn't too overwhelming.  

The 2 batches I made are almost all the same, untouched cookie cutter, the princess ball gown.  For Prince Philip (Sleeping Beauty's prince...the one with the red cape), I simply cut off the top of the gown cookie before baking.  Prince Charming required a bit more cutting, as I started with a basic square to give him his oh-so-handsome, broad shoulders.


I did make an extra large number of these princes, in comparison to the number of princes...come on, if you were a 5-year-old boy (or younger brother), would you really want to choose a princess cookie?  No, the answer is no (in case that wasn't clear).


Cinderella and Belle both got a spray of silver and gold sheen, respectively, after they had dried to give their dresses some sparkle.  Otherwise, they were basically only 1-2 colors.


Aurora (Sleeping Beauty) and Rapunzel were also just 2-3 colors.  I loved how Rapunzel's skirt had a bit of a petticoat underneath...
ah, such a fair maiden.


Both Rapunzel and Snow White had similar sleeve detailing.


Anna and Elsa were the most popular cookie choices of the young guests.  Anna was the most difficult cookie to create, simply because of the amount of colors required.  Elsa's dress was accented with sanding sugar to really give it that "magical quality," although she became a bit more curvy than originally designed (!).


On a platter, they really did look so pretty. 


Perfectly captured the theme of the day, and it was a very cool feeling to know that I created something that made the kids 
light up with excitement...
especially my little birthday girl (which was the whole point after all).

Tuesday, July 28, 2015

Sweet Treats for a Sweet Girl (January 2015)

Our little friend, Ashlyn, turned 3 in January, and her mom, who has a flair for creativity (and Pinterest searching), was throwing a Candyland-themed party.  This was complete with a full-scale Candyland board game in their basement.  This was such a fun and different idea for a party, that I welcomed the chance to make some less ordinary cookies in her honor.


These cookies were 100% inspired by Sweet Sugarbelle and her amazing imagination.  I'll be honest...these were tricky!  Between creating the right cookie shapes and having at least 6 frosting colors on-hand at all times, they were definitely a challenge.


Sweet Sugarbelle has designed a few cookie cutters specifically for Karen's Cookies' on-line store, one of which is this cookie jar cutter.   I thought that might make a nice jelly bean jar.  But, I had to piece together several different cookie cutters to make the gumball machine.  Seriously, it's been so long since I've made them and am only now posting about them, that I'm not sure I even remember what I used!  I think it was the bottom of a tiered wedding cake + large circle + small circles.  Either way, they took a lot of experimenting and patience, and when they were done, they were, well, huge!


To decorate them, I used wet-on-wet icing to create the gumballs/jelly beans inside the machine, and then once they had dried, I added more candies on top to create the dimension I so admired from Sweet Sugarbelle's original design.  My mini jelly beans might have looked a bit off, but they were also made by hand-cutting, so I think I deserve some slack. :)


I actually had cookie cutters for the wrapped candies, which made things a lot easier.  Those were probably my favorite with the swirl, embellished with more sanding sugar.  The striped peppermints were made with my number 1 cookie cutter (trimmed), and the Necco wafers were made with a diploma cookie cutter (trimmed) for some interest.  My husband wasn't sure what they were, but Necco wafers are a thing...and they are colorful, even if they aren't the yummiest.


Every birthday girl needs her own special cookie, and I will definitely keep this personalized cupcake cookie in mind for the future.  With a few sprinkles/quins, these were quick, easy, and colorful!

Happy Birthday, Ashyln!
We were happy to share in the (very sweet) celebration!

Thursday, October 16, 2014

Happy Birthday, Peanut! (September 2014)

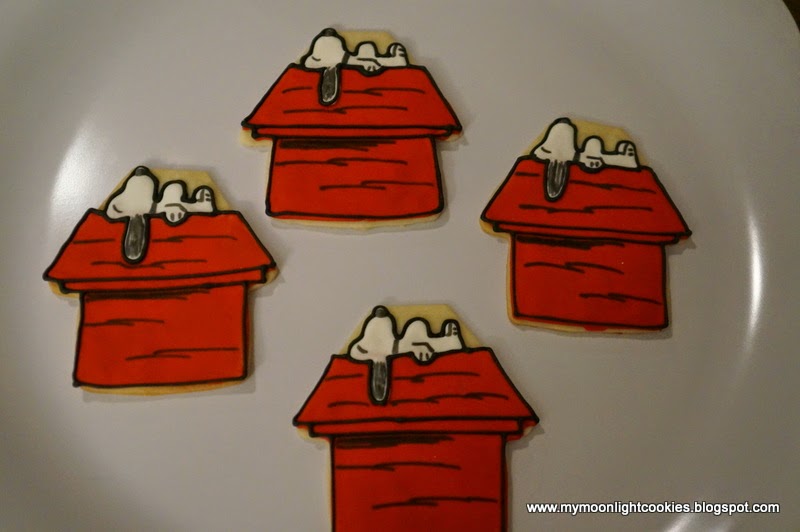
Wow, am I behind on blog postings!  I made these cookies (at least a month ago) for my friend's daughter's 1st birthday party.  The little girl is such a cutie pie, and she has since earned the nickname, "Peanut" from everyone she knows.  Therefore, her mom decided Peanuts (and all things Charlie Brown) was to be the theme of the party.  After some thinking, we decided that this design would be the best favor to hand out. 
(Maybe symbolizing the end to a good party? :)


I used a house cookie cutter and trimmed off the pointy top.  I didn't realize just how big this cookie cutter was, though...it required 3 batches of cookie dough to make the requested 80 cookies...woah.  I outlined and flooded the cookies all in red, and then free-handed a white Snoopy dog on top.  He's actually just a bunch of little lumps, and after doing 80, I sort of got the hang of it.


I re-outlined Snoopy and his house in black to make the colors really pop.  I thought about my next step for awhile, but since these were cartoons originally, I used a black food marker pen (as opposed to more icing) to sketch in the details, giving it a more hand-drawn look (since it was!). 


 I bagged and tied them with with a red ribbon to finish them off.


A fun project for sure, and although we had to leave the party before the favors were passed out, it sure seemed that Miss Peanut was having a great time.

Best wishes to the birthday girl!

Wednesday, July 16, 2014

Everybody say, "Yea-ah!" (June 2014)

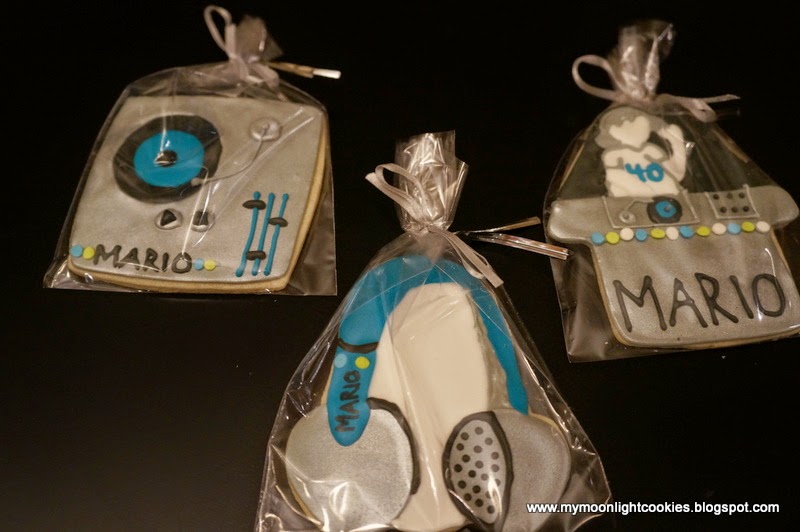
One of the moms at my daughter's school approached me to make some birthday favors for a surprise party she was throwing for her husband's 40th birthday.  But, not ordinary "Happy Birthday" cookies...there was a theme.  (I was loving the idea already.)  She told me that he works hard for his family, holding a steady job during the day and DJ-ing gigs at night, so she was using his DJ hobby as the theme for the party.  The wheels in my head were turning already.  I did some searching on-line, and I found an image on pinterest that I knew I could use as inspiration. 

With her approval, I moved forward designing personalized turntables, headphones, and DJ booth.  


The turntables were made from a square cookie cutter.  I tried to tie all the cookies together, using the same colors, same quin accents, and same silver sheen (Wilton food mist).  I sprayed all the silver parts first, then continued on, decorating the accents.  I also tried to design them with the colors she had in mind and without too much black (no fun to have everyone with black mouths at the party, as seen in previous record cookies...eek!).

 
The headphones were made from the most unusual cookie cutter, a teddy bear, which required a bit of cutting before baking.  I struggled a bit with how to add texture to the headphone speaker, even trying one of Sweet Sugarbelle's newest techniques, but after attempting with little success, I decided that simpler was better in the end (as it usually is).


The DJ booth was definitely my most challenging, but most rewarding.  I used a house cookie cutter with a little bit of trimming pre-baking.  The 20-second icing was used in stages to give an outline to our guy's arm and head, but was otherwise not as intimidating once I attempted it.


These were fairly big cookies, at least 4-5 inches, so it required more than one batch of dough...good for me to remember in the future for these larger requests. 


 I bagged and tied these cookies up, and they were used as favors for all the guests.  


This mom put so much work into the party details and planning, and I was glad I could play a small part in it too.  I hope he was truly surprised and that the party was a success.  

Happy Birthday, Mario!

Saturday, July 12, 2014

Happy Birthday, Little Tiger! (May 2014)

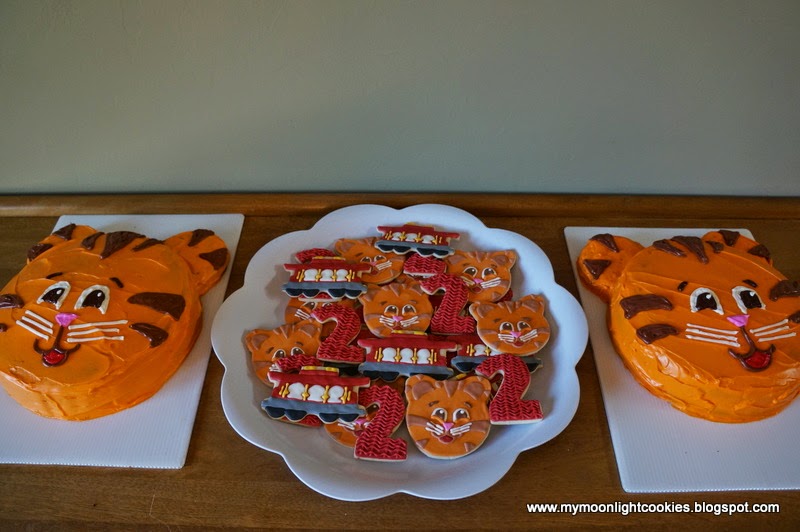
Wow, how is my boy 2 years old?!  I mean, when did that happen?  He is at such a fun age though, talking up a storm and doing everything his big sister does.  We don't have that many shows that we watch on tv, as there are only a couple that I trust and feel I don't have to screen episode-for-episode.  Daniel Tiger is one of them.  It's a sort of spin-off of Mister Rogers' Neighborhood using familiar characters and short songs to teach social-emotional lessons.  My kids soak these up like sponges, and it's amazing, but during a rough time, we'll sing a little tune from the show, and it seems to just click with them.  Anything from, "When you're sick, rest is best" to "Use your words" to "Stop and listen to stay safe."  Anyhow, being a therapist, I could go on and on with how much I love this show, but thankfully since my son is so enamored with it too, I could filter that love into cookies for his birthday party.

Although we're focusing on cookies here, I wanted to include my 2 birthday cakes I made.  (One would definitely have been enough, but at the last minute I got worried that I would fall short...did you hear that one-year-from-now Beth?)  Anyhow, I made the cake part real easy.  I used boxed-cake mix, boxed-brownie mix (for the gluten-free ears), and pre-made frosting (who doesn't love that?).  I used my food coloring to decorate, and it really was simple compared to the cookies.


For the cookies, I knew I wanted to make Daniel.  I used a simple circle cookie cutter and added two smaller circle shapes to the top for ears prior to baking.  Then I flooded it orange and added details.  I used one of Sweet Sugarbelle's tips on adding that little white glisten dot on his eyes, and I think it helped bring him to life.


Next, I made his trolley using a trolley cookie cookie cutter.  After trying to figure out how to create one with a train cookie cutter and some other shapes, I ended up just giving in and purchasing one from Karen's Cookies.  (They have almost any shape imaginable, and they are so friendly.)


Finally, I wanted a more basic design for the platter, since the other two were more elaborate.  I purchased a set of number cookies from Sur La Table.  I know, I keep buying cookie cutters, but how could I not have a set of numbers?  I have all the letters, and I'm sure to use them again, and hey...stop justifying, my collection is a few cents each.  (I know I have a sickness.)


 These were outlined and flooded with red, and then, I tried to give it some texture, resembling Daniel's favorite red sweater.  I'm not sure if I captured the knitting, but it was an interesting pop of color on the platter.


Everyone ended up taking some cookies home as a favor, since our guests tend not to want to touch the cookies on the platter during the party despite my insisting.


It was a "grrr-ific" party, and I know my little guy had fun celebrating.  
Happy birthday sweet boy!

Thursday, March 27, 2014

Birthday Bouquet (March 2014)

Growing up in a house with two younger brothers, at times I would be jealous of my friends with sisters...someone to understand all that girl stuff plus double the wardrobe to share, right?  Well, it's not like I don't love my brothers, but I admit that I feel lucky to have some pretty awesome sister-in-laws (all of whom also grew up as the oldest with only brothers as siblings...there's an unspoken bond there for sure :)

One of my sister-in-laws just had a milestone birthday, and although she is still younger than me, I won't disclose her age just in case.  However, we had a little family celebration, so I definitely wanted to contribute some dessert...cookies.


The flowers were pretty straight-forward using, well, flower cookie cutters both big and small.  I used The Cookie Artisan's Springtime in Paris cookie platter as inspiration, but I wanted to add leaves to the some of the cookies for a little variety.


I used different sizes from Wilton's leaf fondant cut-out set, and I overlapped the flower and leaf with the dough prior to baking.  I think the double-leaf flowers are my favorite (but they were pretty big!).


Using the same colors, I had some fun making the monogram cookies, although it took a bit of trial and error.  Originally, I had photocopied some monogram initials I liked, put some wax paper over the paper, and piped the icing on top of the wax paper.  However, next time I'll need to choose a thicker font and be more patient in the drying process, as they all broke when peeling them off the wax paper.  Ah, live and learn.

I ended up free-hand piping the letters on after some practicing.  And, although each "R" looked a bit different, they all got the message across.  :)


I liked this little design so much that I made "M" and "C" monogram cookies and placed them each in a favor bag with accompanying flowers for other friends in gratitude and for celebration.


This color palette just makes me think of spring.  As of March 20th, it is officially here...


And to my awesome sister-in-law, Happy Birthday!

Saturday, March 15, 2014

Frozen Friends (March 2014)

Ah, birthday season is upon us at our house, and this year, the theme was easy.  Disney's "Frozen" movie has seemed to become intertwined in just about all aspects of our lives since its viewing in late December.  We dress in their costumes, sing the songs, watch the you tube videos (now limited to 1x/day!), and make-believe we are the different characters daily.  Not only was it our daughter's first movie in the movie theater, but it soon became our son's first too.  We found one of those sing-a-long showings, and wow did they sing!  It's amazing how they really have no inhibition at this age.  And, it's so fun as parents to watch them watch/sing/play with something that they are so in love with.

So, Frozen it was for the birthday party.  Since she was set on character cookies, which were quite a challenge, we opted for an easy brownie dessert (with a decorated cookie as a garnish).


I found these snowflake sprinkles from Kreative Baking Shop on Etsy, and I thought their colors went well with the Frozen decor.  The brownies are actually a recipe I found on Bake at 350's blog, and they are the best (if I may say so!).  She calls them "Birthday Cake Oreo-Stuffed Brownies," and they are exactly what you think.  Birthday Cake flavored Oreos baked inside these fudgy brownies...yum!


  The cookie platter was more time consuming.


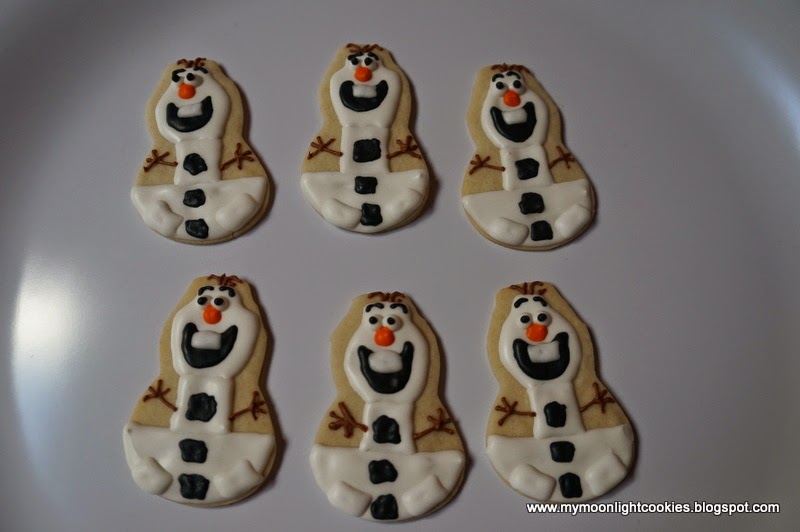
 I played it safe with my go-to snowflake minis and new favorite snowman, Olaf, as seen in a previous post.  He was made from a snowman cookie cutter, with the hat trimmed a bit.  He was a necessary addition to the platter, especially with all the boys we had at her birthday party.


I was much more worried about the Anna and Elsa cookies.  I found some cookies for sale on Etsy from Pastry Tart Bakery for these characters that helped me form my own design.  Here is their take on Anna and Elsa.  I liked how they sort of cropped the girls' dresses and how they styled their hair, but I wanted my girls to have their eyes opened, a risky endeavor I later found out.


You know, I am not the best at free-drawing, especially when it is Disney I'm trying to imitate.  It was funny to me how each of the girls looked different, despite using the same decorating techniques.  My best friends for this project were Americolor's Food Decorator Pens, especially when I was drawing the facial features, to get all those small details.  And, while overall, I can critique each one, once they were on the platter, I think they resembled the characters enough that they still were "like" each character enough...you know, "Anna-like" and "Elsa-like."


And, I'll take that.


A very happy birthday, to our now 4-year-old, who is definitely "worth melting for!"